On Shelli's Creative Blog this Month she asked us to post green cards. Every year in my classes I do a version of this card and wanted to share it with you. It is a booklet type card that folds out to reveal 3 seed packages. It is always a hit this time of year because of Mother's day. It could be shared year round and for any occassion.
I have several views so hope you like it.
I am so excited to announce that beginning May 1, Stampin' Up! is offering a fully customisable Starter Kit for new recruits at a new lower price of $99! This will give you the perfect start to your business--your way!
When you join my Stampin' Up! family, the choice is yours to put together a kit with any of our current high-quality products--you can choose up to $125 worth of any Stampin' Up! products! You'll also receive a business supplies pack (valued at $65) to create a kit with a total value of $190 that still ships for FREE!
With the introduction of the new Starter Kit, you will no longer have the option to purchase another kit or the add-ons. So if you want to order the current kit option, you will need to sign up by April 30, 2012, 11:50 PM (MT).
Joining is quick and easy, you can do it online at my website and start ordering right away.
http://dpippin.stampinup.net
Don't forget you get a free stamp set of your choice up to $30 in value as a welcome gift from me for joining my team. This special is from me only, not Stampin' Up!
Plus what is even better, the new catalog is right around the corner which means as a Demonstrator we can pre-order new items starting in May!!
I would love to have you join my team of amazing Demonstrators that are all over the USA, please let me know if you have any questions.
Convention registrated has already started, as a Demonstrator you will be able to join the thousands of other Demonstrators July 18 -21 in Salt Lake City, Utah, there we learn about new products, hands on stamping, meet new friends, get lots of goodies, and have the time of our lives! Won't you join me?
Not only do you get free paper for a year with one monthly order I will throw in 2 more standard color pads of your color choice once I get confirmation of you joining.
One of the best things about joining is you can reserve your spot for convention this year in Salt Lake City!
I would be glad to have you on my Lucky Ladies Team Just go to my website and sign up now!
http://dpippin.stampinup.net
I have designed a Gable box from the same scoring and dimensions of the Tea for Two template. You just cut it a little differently and don't cut any pieces off. Start with a 12 X 12 piece of sturdy DSP or Cardstock. Cut off 3.5 inches so you have a 8.5 x 12 piece.
On the short side score at 2.5 inches and again at 6 inches with your simply scored from Stampin' UP!
Turn paper and score on the long side 1.25", 2.5",5",7",9.5" and 10.75"
Cut into the middle scores at 5 and 7"up to the 2.5" score on one side and then 6" score on the other side. Then go to the outer edges and score up to the 2.5" score on the 2.5 and 6" score lines then go to the other side and cut back to the 9.5" score line at both 2.5" and 6" score lines.
Clear as mud right?? how about a picture
you can take your oval punch and punch into the middle rectangle on each end this will be your handles so make sure you go far enough in up to the edge of the first score line is good.
Then you are going to fold and crease the squares next to the middle cuts outward toward the handle section. Do all 4 squares.
Here is another picture for you.
At this point you are going to reinforce your folds in the middle and flip up those flaps and you will roll each side towards the middle. It will be kind of fuddlely (is that a word?) but you can do it.
Here is another pic
The two flaps should fit together and fold them at their first score from the edges and tip downward inside the box the other score will lie flat across the top area and the handle piece gets tied with the ribbon. If you wish you could glue those top side pieces together you can but I never even have to use adhesive with mine.
Hope you enjoy this fun project. Here are a few more pictures
here is another size that has been a big hit with many of the demonstrator friends I have and have traded with at many regionals and conventions
here are the dimensions and scores
I call it a mini lunch box and it will hold a hersheys nugget perfectly
cut card stock 3 1/2" x 5"
on 3 1/2" side score at 1" and 2 1/2 "
on the 5" side score at 1" 2" 3" and 4"
you need to use the itty bitty punch that has the fancy oval to cut the handles in the ends
then cut the two scores on the ends up to the first scores on each side
then on the long side do the same to the middle score
don't cut anything off
but you will fold the 4 squares that are on each side of the middle 2 sections
they will fold toward the outer sides
then when you fold the box the middles fold inward and the folded sides towards each other do one side then the other and it works best if you fold in one top side then the other fold the handles in and give it a little press. tie a ribbon through the handle and you have a cute little gable box,
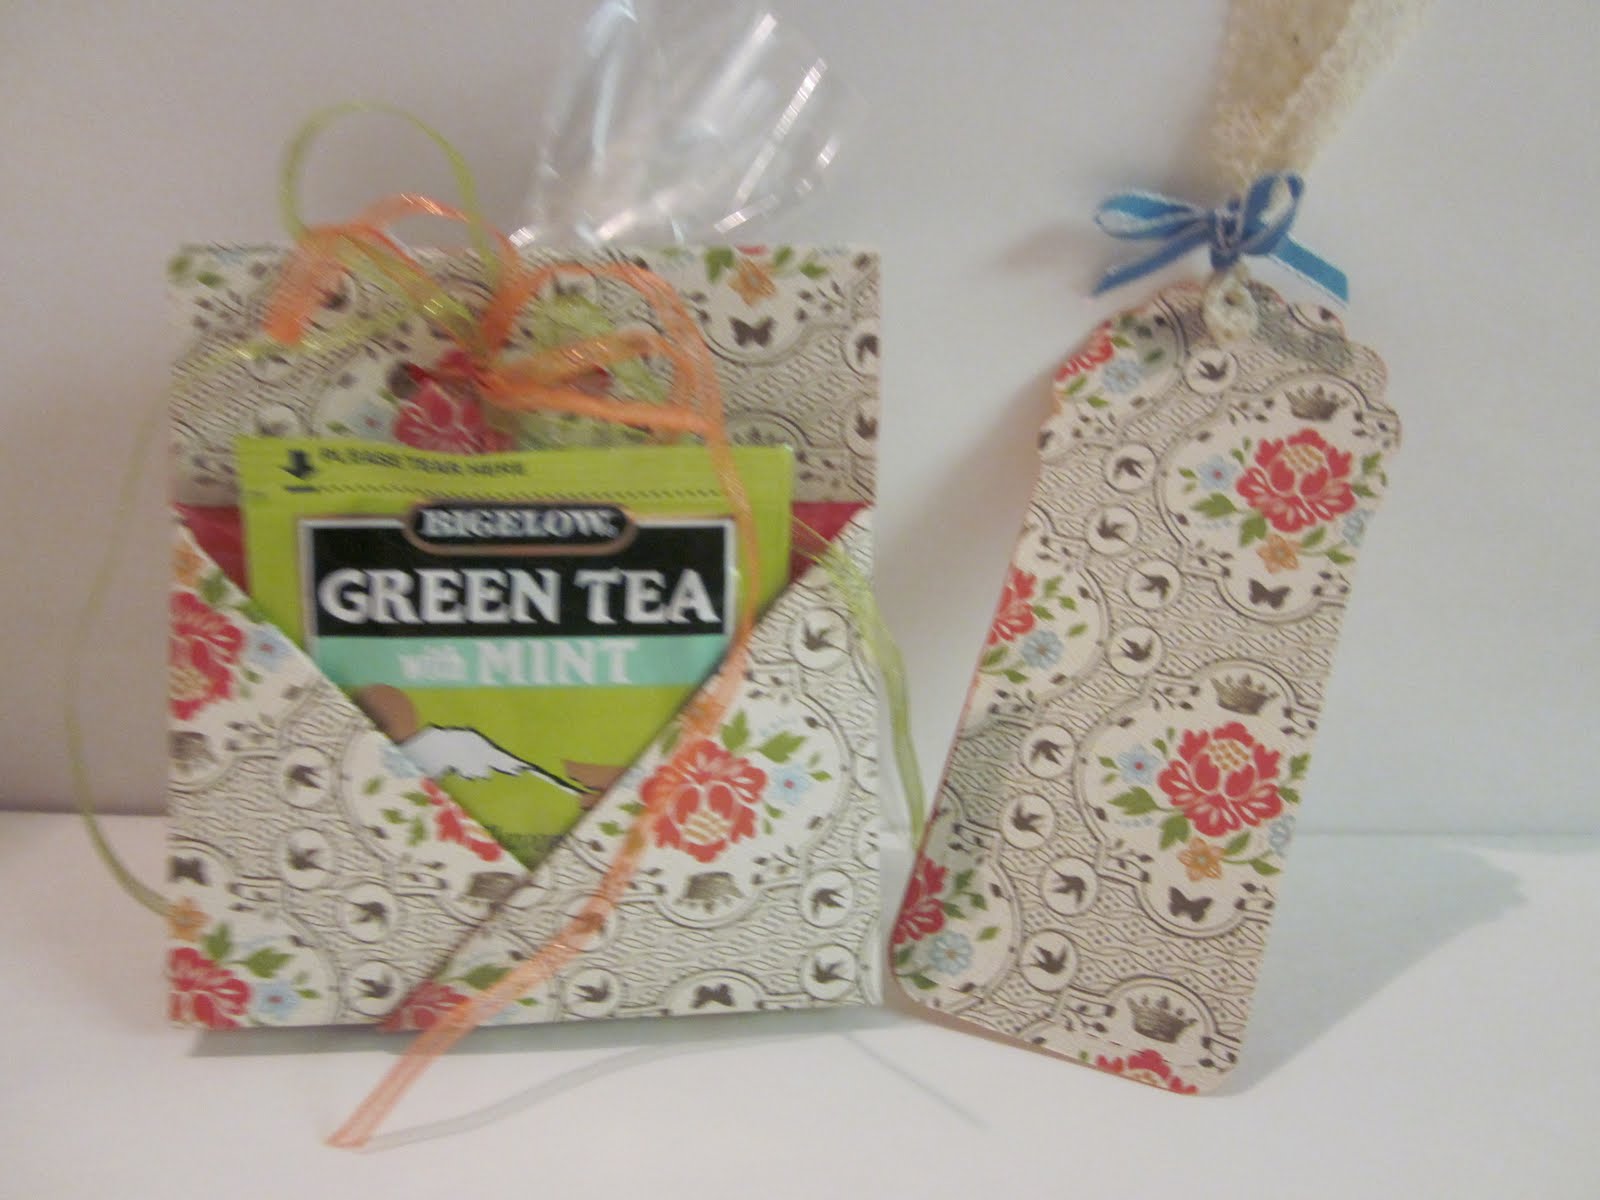
A friend of mine has put up the instructions for my Tea For Two tea bag and cookie holder invention. thanks so much Chiaki Haverstick for making it look so simple. Her instructions are awesome with plenty of pictures for you to look at.
here is the link to her blog and instructions. http://stampingpro.com/wp-content/uploads/Teabagandcookieholder2.pdf
Another fellow demp has made a video of My personal pattern of the teabag and cookie holder I call Tea for Two her name is Kimberly Morris and here is her link Although she refused to give me credit her video is excellent, Not sure why some demonstrators don't want to give credit where credit is due but to each their own. I demonstrated at San Antonio at a Stampin' UP! regional and this is my own original pattern and instructions.
Have you ever thought about getting the Stampin' Up! My Digital Studio Software? If you have, now you can give it a try for FREE!
Stampin' Up! is offering a 30-day My Digital Studio Express trial version beginning February 1, that you can take advantage of.
With the FREE trial, you'll get:
•Full access to the software at NO COST.
•Full design functionality.
•Exclusive artwork that comes with My Digital Studio Express.
•Opportunity to purchase additional downloads from designer templates to stamp brush sets--and everything in between.
•Access to our professional print services.
It's simple; add the free My Digital Studio Express trial (item 129600) to your online shopping cart, and then download and install it from your Download Manager.
If you don't already have the My Digital Studio software, make sure to take advantage of the free trial offer. Try it out and see the fun and ease of My Digital Studio.
Several of you have contacted me with your questions about the FREE 30-DAY TRIAL for Stampin' Up! My Digital Studio. I have found that many of your questions can be answered here: FAQ's about My Digital Studio Trial.
The most asked question is:
Q: How do I order the My Digital Studio Express Trial?
A: You can order My Digital Studio Express through my Stampin' Up! Online Store. You can order the free trial by itself, or you can add it to an order with stamping supplies or digital downloads. If the My Digital Studio Express Trial is the only item you order, you will not be asked for any credit card or payment information. If you are a new online customer, you will need to create an account.
In addition, Stampin' Up! has several training videos that can be found here: My Digital Studio Training Videos
Thought you might like to see What I experienced my first time at an authentic mexican restaurant. Many pictures tell the story. The Taco Salad I was served was fantastic. The Bakery smelled so good and looked delicious.
Each Month Shelli Gardner has a creative challenge and asks us to participate in a creative challenge. I encourage you to visit often to gather fresh and easy ideas to expand your creative horizons. This month I am submitting these two cards that are stunning to the viewer but very Simple to make. The first one I simply glued some of my punched elements onto my cardstock layer and ran it through my amazing Big shot and square lattice folder available in the Stampin' UP Idea Book and Catalog. I mounted the layer onto another layer and card base and was finished with my Simply Stunning Card for Valentine's Day.
My next card is just as simple but I stamped with the Clearly for you stamp in each corner of a Blushing Bride Base piece to make it look like a Table cloth and then took our Tea Shoppe Tea Cup stamp. I stamped it in Tangerine Tango onto Blushing Bride and Colored the image with Tangerine tango out lining the flower a bit with Regal Rose Marker. Cut the tea cup out and glued it onto a Pear Pizzazz piece and then ran it throught the Square lattice folder. Mounting onto a layer and card base my card was finished! Simple can be elegant without being hard to do. Hope you enjoyed this and try it for yourself.
I was so honored to be asked to demonstrate at Regionals in San Antonio. I had my own booth and had to do the demonstration several times. I didn't get to see any of the other demonstrations so if you demonstrated please send me your information. I only wish they had kept everyone in the Theater and let each of us present on stage. It would have made more sense for each of us to just do it once and for the corporate to only have to do their thing once. I am sure we could have worked out the make and takes times with each group rotating between breaks and doing one project at a time. Just sayin'. I do feel honored they picked me and I enjoyed seeing your faces up close and was happy to answer any questions.
This first one is from the new Twitterpated DSP that is in our new Ocassions Mini. I just love love love that paper! And I am sure you will too!
Notice the little center on my bookmark that sits in the project? You can make one and it adds a great bit of dimension to the flower. Just get the new blossom punch and fold inward all the petals (sponged it looks great) When you push down the last petal poke it under the first folded petal. Kind of neat right?
The dimensions for my project are 12x12 then minus 3.5 inches off one side.
making paper 12x8.5"
score on short side at 2.5" and 6"
Score on long side at 1.25, 2.5, 5, 7. 9.5 and 10.75
you will need to cut the 2.5" squares off each corner there is a score in there that will be used later but just ignore it when cutting the 2.5" squares off.
The next squares get folded toward the middle on the diagonal.
There will be two flaps on each side of the center fold them inward and you will see where the pockets are made from.
Turn the paper over finding the 5 and 7" scores and bending them so the ends of the paper meet forming a tent shape. that top (first and last) score can be folded inward or outward depending on which side you want showing. Your crop a dile will come in handy for making two holes at the top where you folded the paper over and the ribbon that holds the cookies (2 in either a 4x6 bag or a clear envelope with the top cut off and a bread tie around it) The outer pockets hold the tea. This project is great because it uses no adhesives! Just the Ribbon which I know we all have plenty of! I will try to get a better tutorial up soon. At least with some pictures of the steps. For now I am on the Road.
This one is made from the everyday elegance DSP in the Saleabration mini. The best part is the paper is FREE! yes with every $50 order you get a free saleabration item. If you are a hostess there is a free hostess bundle for qualifing sales!
The Bookmark is made by stamping the tea cup from the Tea Shoppe set also in the Ocassions mini and cutting a template and tracing it onto glossy white paper. Then cut that out and stamp it with versamark with the bordering on Romance stamp set (also in the ocassions mini) then clear embossing powder is added and heated and image colored with our wonderful classic Markers that seem to glide across the image. I added a tiny bow on the handle of the cup and added it to the two tags die. Simply fold your 8.5x2.5 piece of paper and put the fold just below the top scallops and it will make a cute book mark that you can add my poem to or just stamp your own sentiment.
This next view is of the center parts where I store our sweet pressed cookies. The cookies use the shortbread recipe. I found if you are having trouble using the press you are probably putting the whole egg in.
Just put the yoke into your ingredients and no egg whites! The egg whites cause it to be too sticky. You must also use real butter and don't line your cookie sheets just put the dough directly on sheet.
Here are some Lollipops that I traded for 3-d swaps. Notice they have that cute center I made up in the centers. They were a big big hit! you do know that it is the same punch from the flower but fold the petals inward one at a time and tuck the last petsl under the first and it sort of locks the little medalian into place. They look cute either stamped or just sponged. We even figured out they are big enough to put a quarter in so they would be a great tooth fairy gift under someones pillow!
This final one is also from the everyday elegance DSP. I love that it has so many beautiful vintage type prints in it and coordinate beautifully with each other.
Thanks for your kind comments.
Debi Pippin
Here is a link to a video tutorial it will make things a little clearer for you...
Although she refused to give me credit for my original design. Not sure why some demonstrators are like that but to each his own.
Thank you Kimberly Morris
http://www.procrastistamper.blogspot.com/
Saleabration starts today so for every $50 order placed you will get to pick an item from the salebration flyer. I am also looking for members to join my team. Now is the time as it is $50 off your kit and you will receive a package of DSP paper every month you order on a demonstrator order for up to a year as long as you order each month! What a deal.
You do know as a demonstrator you get 30% off your first order and 20% off of each order following. Plus many many other perks. One biggie is being able to attend Convention and other SU events, come on and join my Lucky Ladies Team. I am offering in addition to the SU offer two free classic ink pads of your color choice.
To Join simply go to my website http://dpippin.stampinup.net
I entered these in a contest on the SO Shelli blog. It uses our Valentine Love Stamp set from our main Catalog at Stampin UP! and the new set in our Occasions Mini catalog PS I Love You. Also several of our punches and border punches. Love the Melon Mambo color with the Cherry cobbler Cardstock.
The other card is using a technique where you glue punched pieces on your base piece and then run it through the square lattice die giving it the effect of a embedded image. I used our sizzix sizzlet with the heart and the heart to heart punch as well as the bird builder punch.
Don't Miss out on the clearance rack items some up to 80% off. Go to my Stampin' UP! website and click on Shop now and them Clearance Rack. Tons of Goodies to choose from. Http://dpippin.stampinup.net
It is rare that all of my grandchildren get together at once; infact that last picture we had of them together was two years ago when I was in the hospital at Christmas and Abby the youngest was not born yet.
Here are a couple of pics of them after a church service at Crossroads Community Church we attended.
My daughter sang in a Service Her Children are CJ age 5
Abby age almost 2 and Emile age 7 They are dressed in the black and Red. The other two are my step daughter's children Mikaila age almost 8 in the pink coat and Jacob age 5 on the right.